Introduction
Hello! You’ve probably found this page by following a link from one of my other blog posts.
This is a detailed write-up of the full signal chain that I’m using to create and capture the audio examples that I publish on my blog. I break down everything that I use, why it is there, and throw in any other details that I think might influence the signal in any noticeable way.
If you have questions that I haven’t answered, leave a comment at the bottom of the page, and I’ll do my best to answer them for you.
Everything In The Signal Chain Is Mine
Before I list everything out, I just want to make one important point: I’ve bought and paid for everything in my signal chain myself. There’s no sponsored / donated gear at all. I’m not trying to sell you anything, or promote any gear on behalf of any manufacturer.
Playing guitar is my main hobby. I don’t do it for a living; I don’t work in the music industry at all. I don’t ask gear manufacturers to send me gear to try, and they probably don’t even know I exist. I’ve no desire for any of that to change.
I started this blog because my friends on Twitter would ask for my opinion on my gear. It just seemed easier to write it up once and then send everyone the link whenever I was asked. From there, it’s become my personal diary – the place where I document my experience and (limited!) understanding of guitar gear and tone as I go along.
This writeup is part of that process. It helps me clarify my thoughts and understanding. And, as always, it prompts new (to me) questions to help me figure out where I’ve still got so much to learn.
I hope you find it useful.
Overview Of My Signal Path
Here’s my full signal path for pedal demos, as of July 2023.
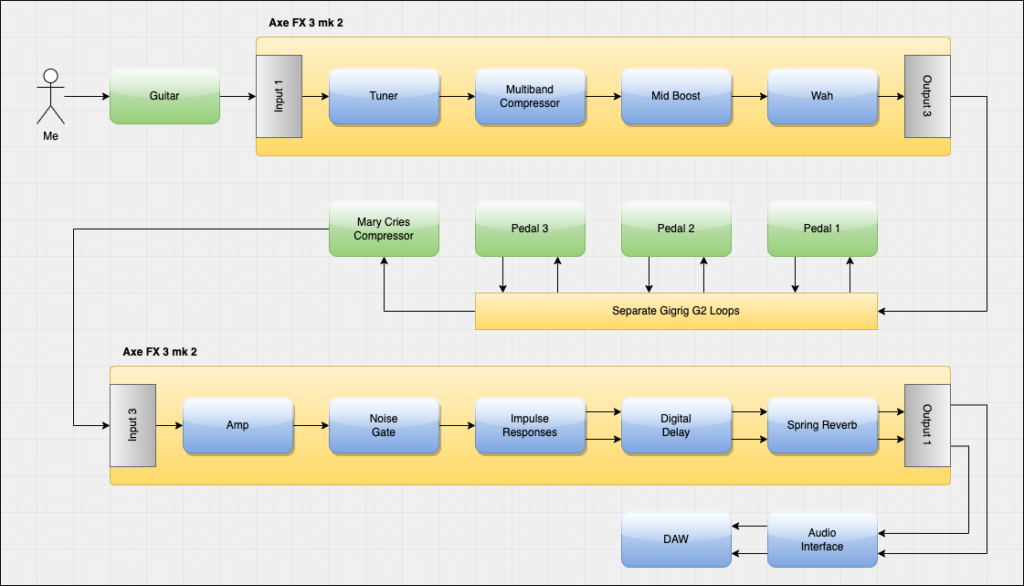
At first glance, you might be thinking that my signal path is quite complicated. It’s not as bad as it looks, honest – and it’s all stuff that I need.
It basically breaks down into three sections:
- tools to improve the tone before the signal hits my pedals
- the pedal(s) that I’m writing about
- amp + cab + delay & reverb
So what’s the full component list in the signal path?
- guitar(s) of choice
- into input 1 of the Axe FX 3 mk2 Turbo
- tuner
- pre-pedal EQ
- multi-band compressor
- mid boost
- wah wah
- out of output 3 of the Axe FX 3 mk2 Turbo
- through my Neutrik patch bay
- into the input of the Gigrig G2
- each pedal in the demo sits in its own G2 loop
- out of the Gigrig G2
- into the PRS Mary Cries compressor
- through my Neutrik patch bay again
- into input 3 of the Axe-FX 3 mk2 Turbo
- amp sim
- noise gate
- cab sim / impulse responses (in stereo)
- digital delay (in stereo)
- spring reverb emulation (in stereo)
- out of output 1 of the Axe-FX 3 mk2 Turbo (in stereo)
- through my Neutrik patchbay again
- into inputs 3 & 4 of my Universal Audio Apollo x6 audio interface
- into my DAW – Universal Audio’s LUNA
Breaking Down The Signal Path Components
Tone Shaping Tools
My guitar goes straight into Input 1 (the instrument input) of the Axe-FX 3 mk2 Turbo.
This is mostly for the tuner. The tuner in the Axe-FX 3 is far better than floor-based tuner pedals, and it’s really handy being able to use the large display on the Axe-FX 3 to see what I need to do to get my guitar in tune.
For some guitars, I also kick in a multi-band compressor. I use this to attenuate low-end frequencies to help my darker guitars have a lot more clarity. I’ve got two blocks for this in my Axe-FX preset, set to tame different frequency bands, but (at most) I only ever use one of these blocks at once.
Very occasionally, I’ll kick in a Filter block to add a bit more brightness to the signal. It’s largely a hold-over from when I was having some problems with my Paul’s Guitar.
Finally, there’s a Wah block in there too, although it’s always bypassed for pedal demo clips.
From there, the signal comes out of Output 3 of the Axe-FX 3, and through my Neutrik patchbay to my pedals.
Isolating The Pedals Using The Gigrig G2
I use my trusty old Gigrig G2 to isolate every pedal that I’m writing about. This is essential: it makes sure that pedals do not colour the signal in any way when I’m not using them.
I got my G2 from the second-hand market back in 2016, and I can’t overstate just how much it has improved the sound of my pedals. With G2, the signal only goes through the pedal or pedals that I’m actually using. Any pedals on the board that I’m not using? The signal doesn’t go through those. It makes such a big difference.
While some pedals are true-bypass, some are buffered bypass. Buffers in pedals do colour the overall tone – even if the pedal is switched off. The only way to avoid this effect is to use something like the Gigrig G2 to completely cut the pedal out of the signal chain when I’m not using it.
This doesn’t mean you’re getting “the most accurate” demo of the pedal. As the signal path diagram shows, any pedal I’m playing through is just one out of a dozen or so components that make up the sound you’re hearing. There’s no such thing as “the most accurate” demo. But at least G2 means that what you’re hearing – and what I’m enjoying – isn’t being influenced by components that are supposed to be switched off at the time.
I’m taking the main amp output of the Gigrig G2, and running into one last effect before it goes back into my Neutrik patchbay.
Sweetening The Tone With The PRS Mary Cries
New for July 2023, I’ve started using my PRS Mary Cries compressor pedal after the Gigrig G2. (The only reason it’s not in a G2 loop is that I don’t have room for it on my tiny home pedalboard.)
I’m using the Mary Cries to simulate the natural compression that occurs inside a valve amp like my Fender Tweed Deluxe amp. To my ears, this compression smooths out the tone a bit, and reduces harshness. I think it makes the overall tone sound a little more polished and professional.
While this is something I can do just as well in the Axe-FX 3, I simply prefer to do it using my PRS Mary Cries compressor pedal. I’ve got the pedal, and I enjoy using it.
Most home tone players aren’t going to be doing this, so most of my audio demos will be done with the compressor switched off. I’ll make sure that I tell you when I’m using the compressor.
Back Into The Axe-FX 3 For Amp Emulation
The signal comes back into the Axe-FX 3 on Input 3. Here, it goes into my amp model and then my chosen impulse responses.
I’ve switched to the Axe-FX 3 for this simply because it’s just easier to record the tone that I’m chasing this way. Much easier than trying to mic up a valve amp + cab at home! With the Axe-FX 3, the tone I’m hearing is exactly the tone that gets recorded. And, as long as I don’t change the settings on the pedals, I get the exact same tone every time I sit down to play and record.
The amp model I’m using is based on the Fender Princeton amp. I’ve gone in and tweaked a lot of the advanced parameters to try and get the amp model sounding closer to my Marshall DSL20HR’s clean channel.
Then, the signal goes into a Noise Gate block. This noise gate is listening to Input 1 (all the way back at the beginning of the signal chain!), and it’s set to kick in as I stop playing. Putting the noise gate here is a technique that Leon Todd has shared many times. It works just as good for low-gain vintage tones as it does for filthy metal tones!
Out of the noise gate, the signal goes into a Cab block, where it gets split into stereo. I’m running a couple of stock impulse responses that sound pretty similar to the two 1×12 cabs I have at home. One side is running an IR from a Deluxe Reverb’s speaker, the other an IR of a Celestion Blue. They’re panned hard left and hard right – again, to simulate having two real cabs in the room.
Staying In The Axe-FX 3 For Delay And Reverb
After the Cab block, the stereo signal goes into a digital delay block. I’m using the Aurora delay algorithm, which is based on the Keeley Halo pedal. I think it’s very flattering!
From there, the stereo signal goes into a reverb block. I’m using the Axe-FX’s spring reverb algorithm all the time. It just suits the vintage-inspired drive tones that you’ll hear me chasing on here.
After this, the stereo signal comes out of Input 1 of the Axe-FX 3 and through my Neutrik patchbay a third time.
Recording The Tone
I’m capturing the stereo signal using my Universal Audio Apollo x6 audio interface. The signal’s coming into inputs 3 &4, and straight into my DAW.
I’m not doing any processing at all on the Apollo x6 – not for the audio demos for this blog, anyways.
I’m using Universal Audio’s LUNA as my DAW of choice. I’ve been using it since it came out, and for isolated guitar demos for this blog, it’s perfect for me. I’m a big fan of how low the latency is (the signal I hear when playing is the one that comes out of DAW).
Keeping The Noise Down
Why Noise Matters
It’s important to me that we can hear how noisy the dirt pedals are – and that means reducing the noise from everything else as best I can. Regular readers will be aware that I haven’t always managed that in the past!
Reducing External Noise
The house is earthed by the power grid using a PME terminal, rather than the rod-in-the-ground TT system. That was done earlier this year, and it’s made a huge difference to the noise levels.
Everything’s powered off two power conditioners: a Tacima CS947 power strip into a Furman PL-PLUS CE power conditioner. The Tacima does most of the heavy lifting to cut out electrical noise from other things in the house. The Furman distributes power to everything, so that every component shares a common ground.
The pedals on the pedalboard are powered by a Friedman Power Grid 10. This gives each pedal its own isolated power supply, to help cut down on noise and ensure that every pedal is getting the power that it wants.
Stopping Noise Propagating
The Axe-FX 3 is running noise reduction in three places:
- on input 1
- on input 3
- the noise gate block between the amp and cab blocks
The aim here is to stop any audio noise getting into the next gain stage, where it would get amplified.
I’ve also got Input 3’s trim turned down by -2.50 db; I run the pedals a little hotter to compensate. Through trial and error, I’ve found that this is very effective at boosting the signal-to-noise ratio, a bit like how mic’ing up a real cab achieves the same thing.
Cabling And The Like
Patching It All Together
The main components in my signal chain – Axe-FX, pedalboard and audio interface – aren’t wired directly into each other. Instead, their inputs and outputs are hard-wired into my Neutrik NYS-SPP-L1 patchbay.
(The only exception is Input 1 on the front of the Axe-FX, where I plug the guitar into.)
To the best of my knowledge, the patchbay is entirely sonically neutral – but I haven’t done my own null testing to prove it.
Where The Buffers Are
In case you aren’t aware, buffers are electronic circuits designed to overcome signal loss over distance. You can learn more about buffers in this article by pedal manufacturer JHS.
One important thing to know is that buffers aren’t sonically-transparent. They affect the sound of the signal going through them, and can significantly change the behaviour of pedals that come after the buffer. This can be a good thing, but if you’re trying to use pedals based on vintage fuzz circuits, buffers can completely ruin the sound.
As far as I know, the inputs on the Axe-FX 3 are all buffered. (Input 1 is definitely buffered; I’m assuming the other inputs are too. None of this is mentioned in the official manual at the time of writing.) I’ve done some A/B testing, and nearly all pedals sound identical whether I go through the Axe-FX first, or I plug my guitar straight into the Gigrig G2. I don’t believe it’s a problem, but I’m mentioning it here for completeness.
There is a input buffer in my Gigrig G2. I keep it switched off for pedal demos.
Buffers In Pedals
Some of the pedals I regularly use in my audio examples have built-in input buffers:
- My Klon KTR has a switchable input buffer. I always switch it on, because I think the Klon’s input buffer is an important part of the pedal’s magic.
- My Warm Audio Centavo and Ceriatone Centura Klon clones have an always-on input buffer.
- Any Boss pedal that I’m using will have an always-on input buffer.
If I find any more pedals that have built-in input buffers, I’ll add them to the list!
Axe-FX 3 vs Real Amp
Why Is There An Axe-FX In There?
The Axe-FX 3 mk2 Turbo might seem out of place in a home tone rig. But really, all its doing is taking the place of a real amp & cab and a bunch of extra effects pedals.
And it’s taking the hassle out of capturing that tone, while arguably sounding better than a mic’d up amp at home volume levels.
Does An Axe-FX 3 Belong In A Home Tone Rig?
Absolutely.
If you price up the cost of individual bits of gear to do what the Axe-FX 3 is doing in my signal chain, there isn’t much in it. While we’re in a golden age where even affordable gear can sound great, there is a clear sound quality difference if you can afford pricier gear like a real Princeton amp, more expensive microphones, and studio-quality effects units. Depending on what gear you choose, even the Axe-FX 3 can actually work out to be cheaper!
Then add in the convenience of being able to all these things in one device. And then add in the convenience of digital recall, allowing me to reproduce the exact same tone each and every time. And then add in the creativity that comes from having a unit that can do lots of other things too, for no extra cost. And so on, and so on.
It’s no wonder that units like the Axe-FX 3, the Line 6 Helix, the Kemper and the Neural DSP Quad Cortex regularly find their way into home tone setups these days.
Final Thoughts
I think it’s important you understand something: I’m not trying to chase anyone else’s guitar tone. I’m not trying to reproduce the sound of famous players or famous songs. Heck, I’m not even trying to show off what a pedal is supposed to do.
My rig is built to help me discover and capture my sound – whatever that might be.
Every component in the signal chain is there for one reason and one reason alone: to capture a guitar tone that puts a smile on my face. With this signal chain, I feel like I’m finally there at last.
It’s been a long time getting here, and I’m sure that I’m not done learning yet. There’ll be changes to the rig in the future. When those happen, I’ll publish new write-ups for you to explain what I’ve changed and why.