‘Studio Diary’ is an occasional series where I talk about building a home recording setup for hobbyists and enthusiasts like us. I share my personal experiences, and the thinking behind some of the decisions that I’ve made along the way.
Fractal Audio have recently overhauled their amp modelling in the Axe-FX 3 / FM-9 / FM-3. And my recent dive into the Orange Getaway Driver has shown me that I need to revoice my signal chain. I’m taking this as an opportunity to re-evaluate everything about the pedal preset I’ve built for the Axe-FX 3.
I’ve dialled in the amps and cabs for my 57 Vintage, 65 Clean and JTM pedal platform presets. Now I want to (briefly) explore the topic of gain-staging, and how it impacts my pedal platform preset (if at all).
[It turned out not to be a brief exploration at all – Ed]
Series Tracker
This is the 10th post in this series. Almost at the halfway mark!
You can see the full list of these blog posts over on the dedicated Axe-FX 3 Pedal Platform Preset page.
Table of Contents
- Series Tracker
- A Huge Caveat
- What Is Gain-Staging?
- Gain-Staging, Step by Step
- Where Are The Places To Do Gain-Staging In A Hybrid Axe-FX 3 Rig?
- Stage 1: Guitar Into Axe-FX 3
- Step 2: Axe-FX 3 Input 3 Through To Output 3
- Step 3: Axe-FX 3 Output 3 To My Pedalboard
- Step 4: My Pedalboard To Axe-FX 3 Input 3
- Step 5a: Axe-FX 3 Input 3 To Output 1 (Dry Signal)
- Step 6: Axe-FX 3 Output 1 To My Audio Interface
- Final Thoughts
A Huge Caveat
I’m writing this blog post because I don’t know much about gain-staging.
The writing process helps me discover what questions I need to ask, and it encourages me to go out and find possible answers.
Are my answers any good? Unfortunately, only time will tell. When (not if) I revisit this in future blog posts, I’ll try and remember to come back here and link to them.
What Is Gain-Staging?
A Technical Definition
Gain-staging is “adjusting the level at each point of amplification to ensure an optimal signal-to-noise ratio, without unwanted distortion”. (Definition from iZotope.)
Let’s try and break that down.
The Signal Chain Is A Series Of Devices That Amplify Audio
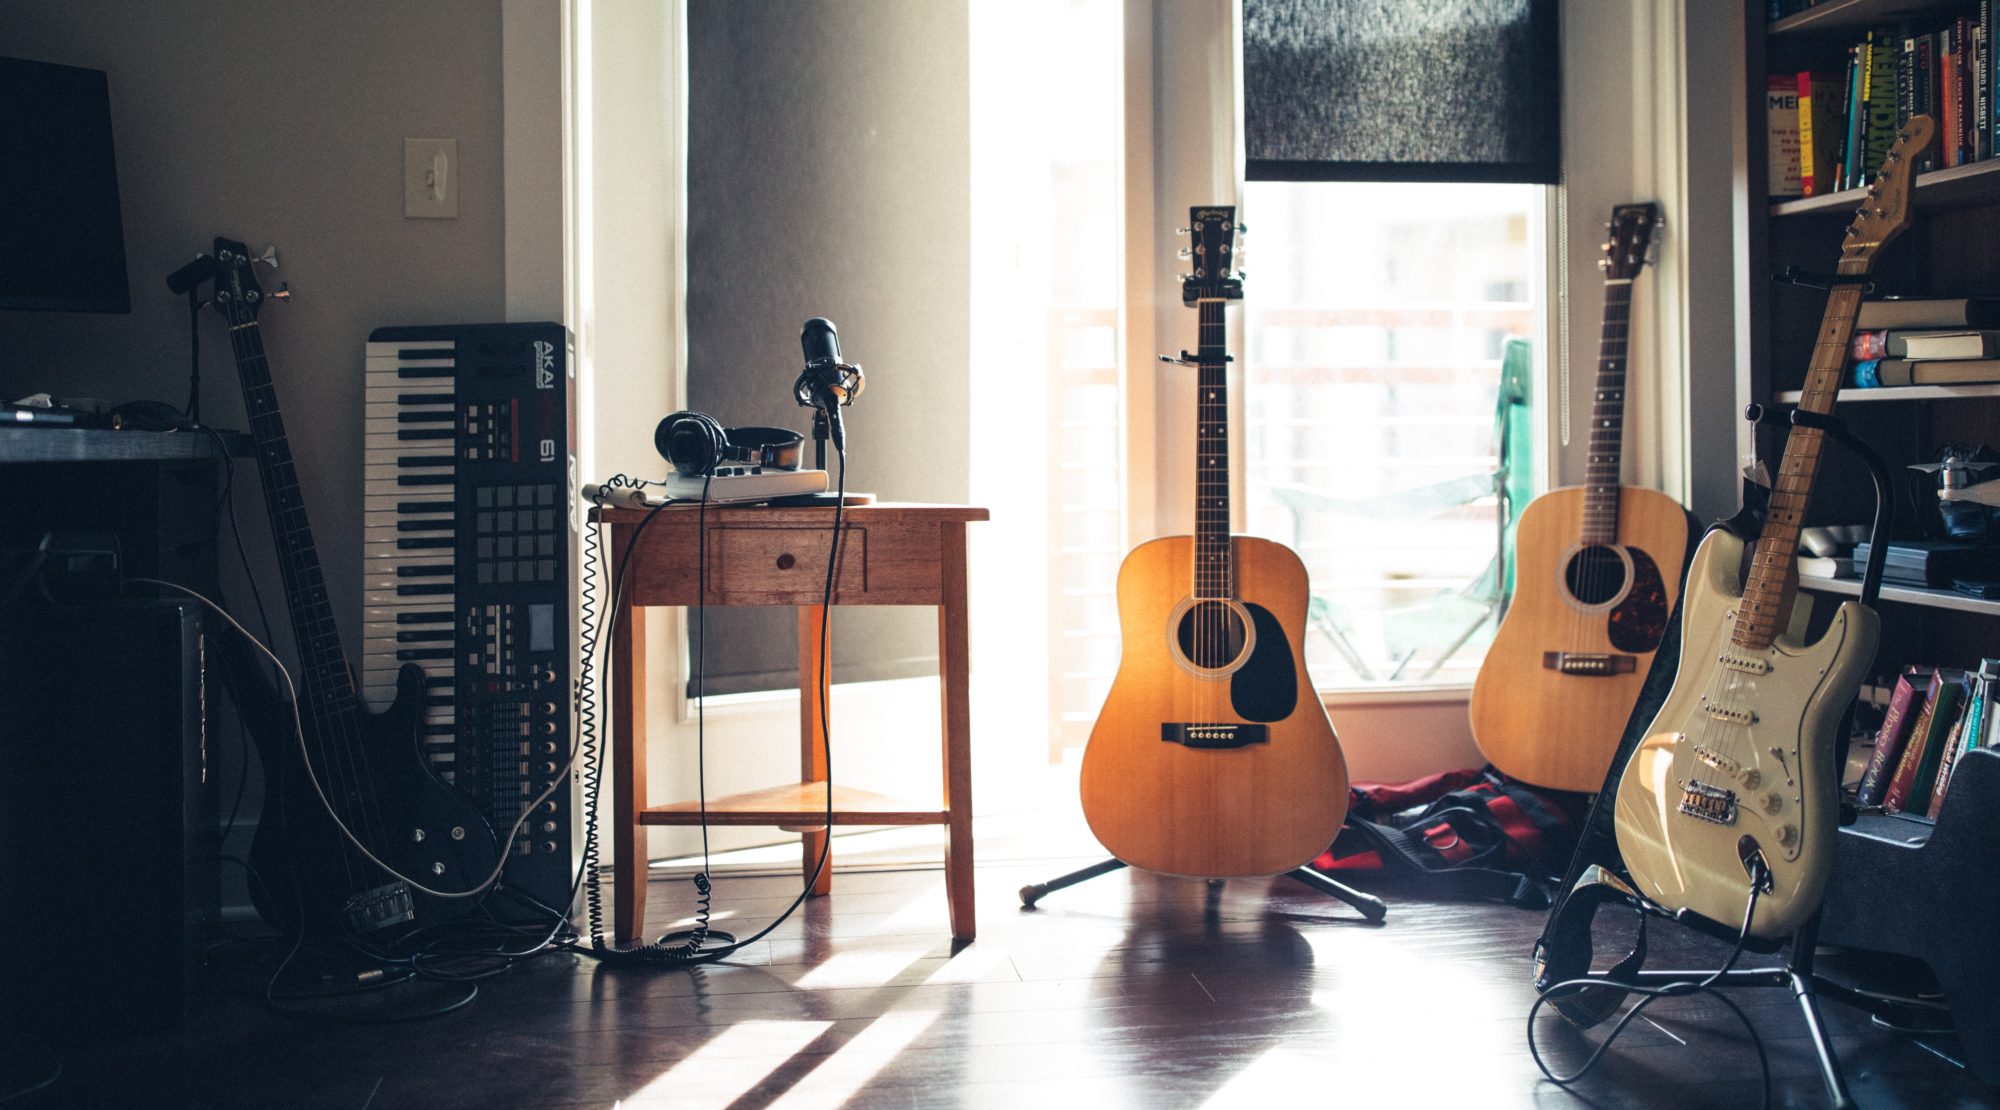
My usual signal chain consists of:
- me
- guitar
- pedals
- pedal switcher
- digital modeller
- audio interface
- patch bay
… and cables. Far too many cables!
All of these devices are either passive or active.
- Passive devices simply conduct the signal from IN to OUT. They’re either completely unpowered (patch bay, cables), or they are powered but the power not used on the signal itself (pedal switcher).
- Passive devices (esp. cables!) can lose some signal along the way. That can be a drop in overall signal level. It can be losing part of the tone (e.g. losing higher frequencies).
- Active devices run the signal through powered electronic components. These components include an amplification stage of some kind.
At first glance, it might seem that all I need to care about are the active devices. They’re the ones with controls that I can tweak, after all.
So let’s focus on those first.
Every Active Device Needs A Sensible Output Level
I think I need to look at devices in pairs of two. I’m going to call them ‘A’ and ‘B’, and assume that the output of device A goes into device B.
Why am I looking at them in pairs? When I’m setting the controls on each active device, I need to answer two questions:
- What input level will device B accept without unwanted distortion?
- How do I configure device A to send that signal level out, and into device B?
The basic idea here is to make the most of device B’s input headroom so that the signal-to-noise ratio is as high as possible.
Or, to put it another way: the hotter the signal coming out of device A, the less audible background noise there’ll be. But, if the signal is too hot, it’ll overload the input of device B and make everything sound horrible.
I want to quickly explore that a bit more.
What Is Input Headroom?
Headroom is used to describe a couple of related things, depending on context.
- Folks will say “amp X does not have a lot of headroom” when describing how loud an amp will get and stay clean.
- Folks will also say “we need to leave enough headroom” when describing the difference between the input signal level and the point where the amp will start to overdrive / distort.
Rightly or wrongly, I’ve found myself focusing mostly on input headroom over the years (possibly because I’m not using amps live, and so I don’t need to worry about creating lots of output volume).
Input headroom is all about:
- how much input signal a device needs to sound its best,
- how much input signal a device can accept before it distorts in an unwanted way, and
- which frequencies need attenuating to increase the input headroom of the device.
In my rig, pedals are the most sensitive to input headroom – and especially sensitive to which frequencies have a lot of energy.
Over the years, I’ve tried quite a few pedals that either don’t like humbuckers at all (the signal is too hot), or don’t like the input signal from neck humbuckers (the signal contains too much low-end).
I’ve also got a few pedals (they’re often modern fuzz circuits) that I think sound better when they’re input starved – i.e., when I deliberately turn down their input signal.
What Is Signal-To-Noise Ratio?
Every audio signal contains noise of some kind. We hear noise as this background hissing. The signal-to-noise ratio describes how much of this noise can be heard.
- A higher signal-to-noise ratio means that we can hear less noise.
- A lower signal-to-noise ratio means that we can hear more noise.
I basically want the guitar signal to be as loud as possible so that it drowns out the noise.
Regular readers who’ve heard my audio demos over the last couple of years may be aware that this has been an ongoing battle for me!
Input Headroom and Signal-To-Noise Ratio Are A Balancing Act
To try and tie this all together …
- To defeat noise, I need device A to pump out as hot a signal as I can get away with.
- For the best audio quality, I need device A to pump out a signal that doesn’t overload the input headroom of device B.
If the signal from device A is too low, more noise will end up in the recorded signal. But if the signal from device A is too high (either overall volume, or the volume in some frequencies), the recorded signal won’t sound very good.
That’s why, when gain-staging my signal chain, I need to work my way along the signal chain and look at the active devices in pairs.
What About Other Forms Of Noise?
For this blog post, I’m only concerned with using gain-staging to reduce background hiss (i.e. to keep the noise floor as low as possible).
All other things we might call noise – especially electrical hum, interference and the like – I’m going to cover those in a dedicated blog post about noise gates.
Gain-Staging, Step by Step
Where Are The Places To Do Gain-Staging In A Hybrid Axe-FX 3 Rig?
When I say “hybrid rig”, I mean using the Axe-FX 3 with external pedals, using the four-cable method (4CM for short):
- guitar
- into Axe-FX 3 (for tuner and EQ tools)
- out to the pedalboard
- back into the Axe-FX 3 (for amp, cab, delay, reverb)
- out to my audio interface
- and into my DAW.
When the signal goes from one bullet point to the next, that’s a place where I can do gain-staging.
Most of the adjustments I’m going to make aren’t actually part of my preset; they’re global settings in my Axe-FX 3. I do think it’s worth going through them all, if only for myself for future reference.
Stage 1: Guitar Into Axe-FX 3
In the Axe-FX 3’s Global Setup, there’s an option to tune the A/D convertors for each input.
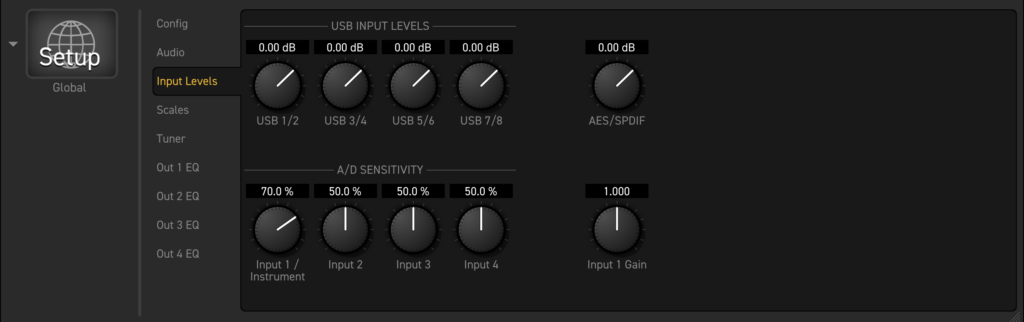
I’m plugging into Input 1 (aka the Instrument input, because it can do the Hi-Z thing), so that’s where I’m starting.
The Input 1 A/D Sensitivity controls the internal gain level of that A/D convertor. It doesn’t control Input 1’s output level at all. Turning it up doesn’t make your guitar signal louder. Turning it up just tells the A/D convertor that you’re using a lower-output guitar.
From the factory, the Input 1 A/D Sensitivity is set at 50%. It’s a safe default that works fine with most guitars.
My guitars don’t have hot pickups in them. They’re low-output, vintage-voiced single coils, P90s or PAF-like humbuckers. As a result, they can’t drive the A/D convertor very hard.
And that leaves space for some unwanted noise to get into the signal.
I wish the Axe-FX 3 had some sort of ‘guitar profile’ feature, so that I could have per-guitar settings for Input 1’s A/D Sensitivity. Alas, it does not, so the next best thing is to dial it in using my guitar with the hottest pickups.
To find the appropriate A/D Sensitivity setting for me, I grabbed one of my guitars that use a humbucker, turned up the setting until the red LED light appeared on the Axe-FX 3’s front panel … and then backed the setting off a bit.
I’m glad that I did this.
I don’t have a way to measure the noise floor (perhaps I should?). To my ears, it sure sounds like there’s less noise in the signal chain now.
Step 2: Axe-FX 3 Input 3 Through To Output 3
My guitar comes into Input 1, through a bunch of EQ-related blocks, and then out of Output 3 (which is plugged into my pedalboard). For initial gain-staging, I’ve made sure all the blocks between Input 1 and Output 3 are bypassed.
Here, I was puzzled by something.
There are audio level meters on the front of the Axe-FX 3, one set for each input and output. They’re just LEDs that go from green to yellow to red. There are no numbers shown on the meters at all. It’s simply that the more LEDs are lit, the hotter the signal.
The puzzle is: the Input 1 meters show more signal than the Output 3 meters do.
For months, I thought that I was losing signal somewhere between Input 1 and Output 3. Given that all the blocks are bypassed, that seemed really odd.
Turns out, input and output meters on the front of the Axe-FX 3 work on different scales.
- Input meters peak (the red LED lights up) at -6 dB.
- Output meters peak at -1 dB.
They’re not directly comparable.
I haven’t talked about any of these EQ-related blocks yet in this series of blog posts, so I’ll have to remember to discuss their gain-staging when I come back to them. The one thing I can say here is that, as a rule of thumb, I’ll be aiming for each of them to produce unity gain (same volume in and out) unless I’m specifically using them as a virtual boost pedal.
Step 3: Axe-FX 3 Output 3 To My Pedalboard
Think of Outputs 3 & 4 as two stereo FX loops for the Axe-FX 3, and you won’t go far wrong.
Each output has a corresponding physical volume knob on the front of the Axe-FX 3. They control the volume of the amplifiers that the output cables plug into. As far as I can tell, these knobs can’t be ignored / overridden in software.
According to the manual, the thing to do here is to turn the Output 3 physical volume knob up to maximum. That ensures that Output 3 is sending unity gain out to whatever is plugged into it.
So that’s nice and easy.
I have set Output 3 block’s Level to 0 dB, so that it is neither boosting nor cutting the volume.
There are times where I will use Output 3 as a 100% clean boost. I’ll discuss that in a separate blog post in this series.
Next, I need to experiment with the D/A convertor for Output 3. It doesn’t have a sensitivity control like Input 1 does, but there is something similar: a Boost/Pad option.

In crude terms, the more I boost the D/A convertor, the higher signal/noise signal I should get. It doesn’t make the signal out of Output 3 any louder; the Axe-FX 3 adds an appropriate pad to make sure the signal that reaches the cable is exactly the same volume (hence calling it Boost/Pad).
I’m using guitars with low-output pickups, so I can get away with using the maximum Boost/Pad setting here of 18 dB.
This does place a limit on any boost effects that I want to put into my preset before Output 3. If I turn those boost effects up too much, it will cause Output 3 to distort – and that’s quite a horrible sound.
Step 4: My Pedalboard To Axe-FX 3 Input 3
This is where things get a little more complicated, because there’s several things to consider:
- the volume from my pedalboard,
- the Level set in Input 3 block,
- the A/D converter sensitivity
and how my chosen Amp block reacts to the level of signal that’s hitting it.
So here, I’m not only gain-staging to manage unwanted noise levels, I’m also gain-staging for artistic / tonal effect too.
Both of my 57 Vintage and 65 Clean presets feature very clean amps with quite a bit of spare headroom. These amps are not going to compress the input signal at all, so (to my ears) there’s nothing gained by slamming the front-end of these amps hard.
I’m honestly not sure what to do here.
But I have to do something … so I’ve gone with:
- pedals on my pedalboard set to more than unity gain,
- Input 3 block’s Level control (the output from the Level 3 block) set to -2.50 dB to compensate for the hotter pedal signal,
- and the A/D converter sensitivity turned up to 70%.
Adjusting the A/D converter sensitivity definitely improves the signal-to-noise ratio for my rig. That comes at the cost of limiting how much I can use the pedal’s volume control to drive the virtual amp. But that’s okay, because I can always turn Input 3’s Level up instead if I really want to boost the virtual amp. (At least, I believe that’ll work.)
In my experience, it’s very difficult to dial in unity gain on many drive pedals. Volume pots on pedals can be a bit twitchy! I find it easier to set the pedal’s volume to be a bit higher and then tweak the Axe-FX 3 to compensate.
I don’t think that running the pedal a bit louder directly helps with the signal-to-noise ratio. It does stop me from accidentally making the pedal below unity gain, and maaaaybe that helps keep the noise down a bit?
I wish I knew more about this.
Step 5a: Axe-FX 3 Input 3 To Output 1 (Dry Signal)
Input 3 comes from my pedalboard, and Output 1 goes out to my DAW. There’s a lot going on in between the two:
- (sometimes) compression and/or EQ tools,
- amp
- cab
- digital delay & reverb
To make this easier, I’m going to sort out the gain-staging just for the amp & cab first. Then I’ll gradually enable the effects, and make sure they’re fine too.
I’ve really struggled to find clear advice on what kind of levels to aim for here. Fractal Audio’s mantra is “use your ears”, which is really unhelpful if you don’t understand what you’re hearing or what to aim for.
So I’ve put together my own technique, which may be utter junk. Be warned!
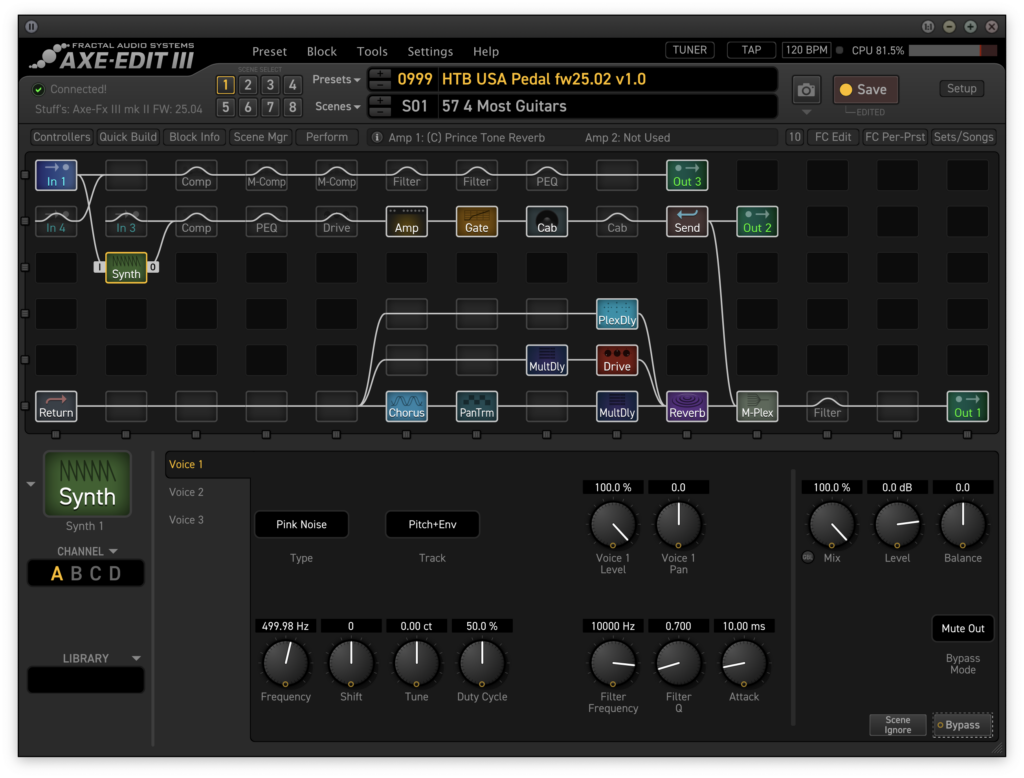
I need a reliable (as in, repeatable) control signal into the Amp & Cab blocks. I’m trying the pink noise method (using the Synth block to generate pink noise) to hit the virtual amp with a suitable signal.
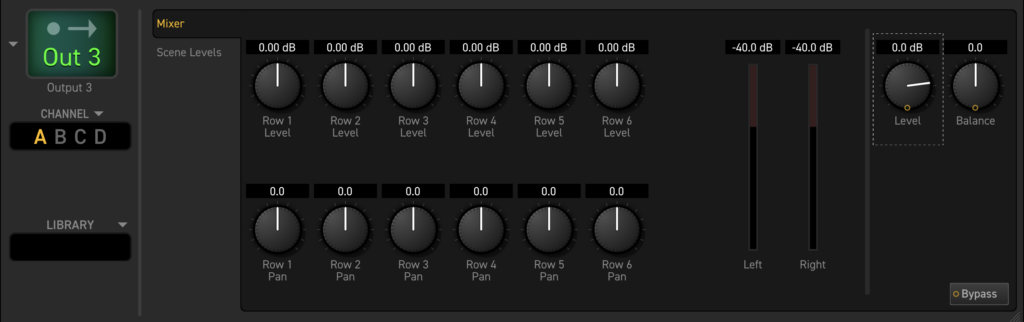
To bypass my delay and reverb effects, I’ve set the Multiplex block to take its input from Row 2 (immediately before the Output 2 block as shown above).
Then, I just play, and monitor the volume at Output 1.
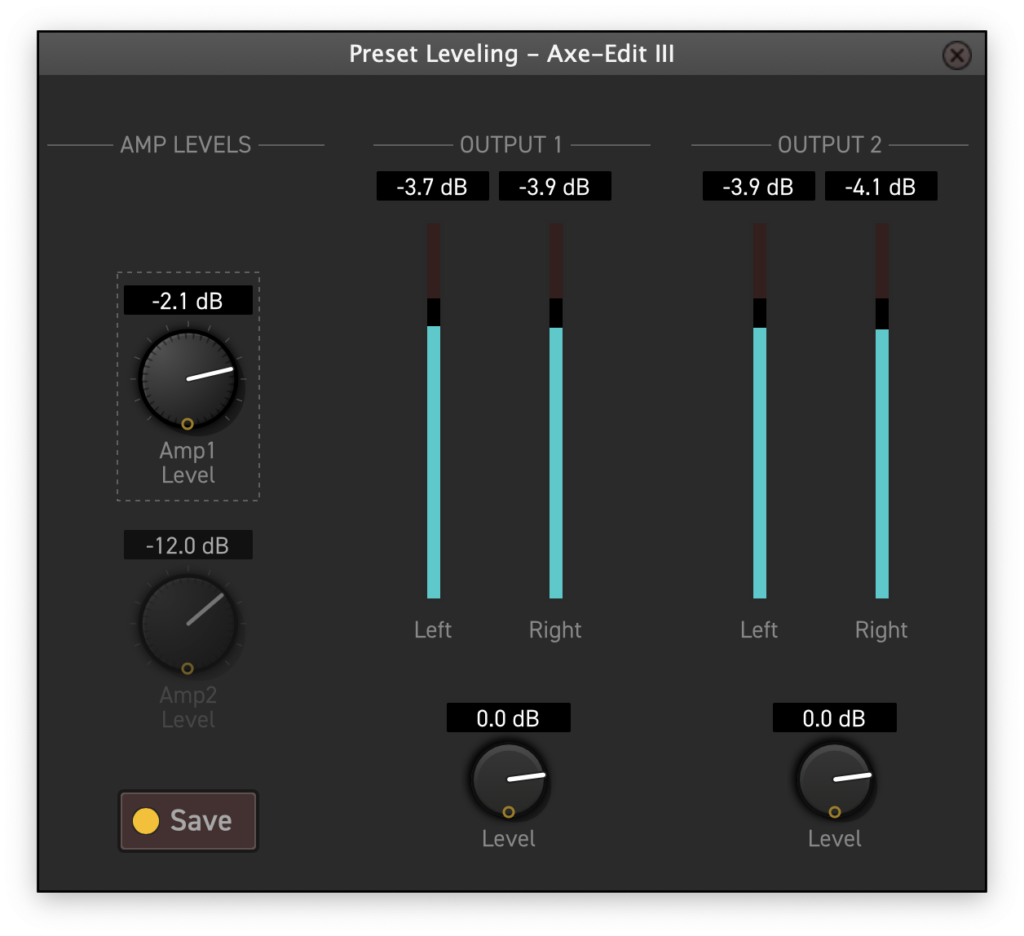
For now, I’m going to ignore the different levels shown for Output 1 and Output 2. They should be exactly the same, but they’re not, and I’ve no idea why. It’s not important today, especially as I haven’t decided where to put Output 2 in the final version of my patch.
Strumming my guitar as hard as I can, I’m aiming for Output 1 to be approximately 0 dB.
Is this unity gain? I honestly don’t know. I can’t find the answer in the Axe-FX 3 manual. I’m going to assume that this is the case until I discover otherwise.
I have to repeat this for every scene in the preset, to make sure they’re all roughly the same volume level.
Step 5b: Axe-FX 3 Input 3 To Output 1 (Wet Signal)
Now it’s time to turn on my delay and reverb effects, and make sure that they’re not boosting the overall signal.
Effect blocks can run in one of two ways:
- in series with the main dry signal, or
- in parallel as wet signal-only effects
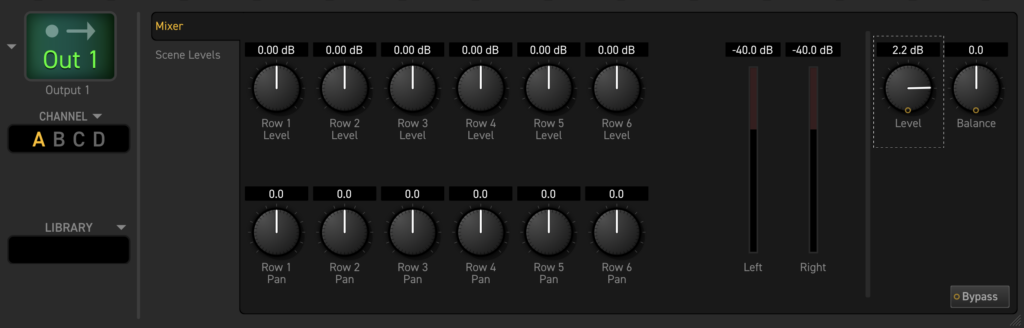
In my presets, the effects on Row 6 (the bottom row in the screenshot above) are in series with the main dry signal, and the effects on Rows 4 and 5 are running in parallel as wet-only effects.
I’ve set the Level on all the effects in Row 6 to 0 dB. This seems to give me (roughly) overall unity gain.
The effects on Rows 4 & 5 use the new Kill Dry signal setting. Their outputs are set to 0 dB (or 50% on that Drive block on Row 5). Again, this seems to give me (roughly) unity gain overall.
I’ll going into the delay and reverb effects in a lot more detail in later blog posts.
Step 6: Axe-FX 3 Output 1 To My Audio Interface
The Axe-FX 3 and my audio interface use different connectors for digital I/O, so I’m doing this the old-fashioned way and using analogue cables between the two. If I did have them connected via digital I/O, I’d have to do this gain-staging step differently.
The key questions here are:
- What signal level do I need to see inside my audio interface?
- What controls can I adjust to achieve that signal level?
- Is there anything I need to tweak to manage the signal-to-noise ratio?
Looking around, there’s lots of different advice on what signal level to record at. When in doubt, ask a pro … ask someone who does this for a living. I found a helpful article on recording levels by Produce Like A Pro.
It recommends:
- signal averaging at around -18 dB
- signal peaking no higher than -10 dB
That’s the advice I’m going to follow.
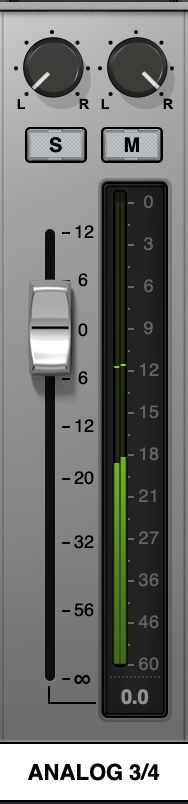
I went into the software for my audio interface, and made sure that the fader was set to 0 dB. (The Axe-FX 3 is cabled up to line-level inputs; there’s no preamp to adjust, just the individual channel’s boost/attenuation level).
I then played pretty hard, and tried to eyeball the average signal level showing for the line-in channels (channels 3 & 4 in my case). You should be able to see a screenshot of what I was monitoring to the left of this paragraph.
Good job I did too! Turns out that, for the last couple of years, I’ve been recording a signal that was averaging closer to -21 dB than -18 dB 🤦♂️. That won’t have been helping the signal-to-noise ratio at all.
To fix this, I need to send a louder signal out of my Axe-FX 3.
The first step was to make sure that Output 1’s physical volume control (on the front panel of the unit) was turned up to max. (Same deal as with Output 3: this hardware control can’t be controlled in software.)
Then, it was a case of turning up the Output 1 block’s Level until I could see the right level in my audio interface’s software. I settled on a Level setting of 2.2 dB.
I’ve used a guitar with humbuckers to set this level.
I imagine that I’ll need to tweak this level for other guitars, such as my Telecaster and its single-coil bridge pickup. What’s the betting that I either forget to, or decide not to make the effort?
Final Thoughts
It was important that I put in the effort to sort out my signal chain’s gain-staging.
Some of the old songs that I want to record use featured guitars in a very sparse mix. I’m worried about how much room that leaves for noise to be heard.
I’ve done some of these tweaks in the past, but this is the first time I’ve sat down and methodically gone through everything in the signal chain like this.
There’s been some guesswork along the way, and I’ve tried to be honest about where I’ve had to make those guesses. I’m sure I’ll have to revisit them in the future when I’ve learned some more!
But, for now, I’m happy to move on and work on other aspects of my pedal platform presets.
3 Replies to “Studio Diary #51: Gain-Staging Through The Pedal Platform Preset”