‘Studio Diary’ is an occasional series where I talk about building a home recording setup for hobbyists and enthusiasts like us. I share my personal experiences, and the thinking behind some of the decisions that I’ve made along the way.
Fractal Audio have recently overhauled their amp modelling in the Axe-FX 3 / FM-9 / FM-3. And my recent dive into the Orange Getaway Driver has shown me that I need to revoice my signal chain. I’m taking this as an opportunity to re-evaluate everything about the pedal preset I’ve built for the Axe-FX 3.
Now that I’m done with the gain-staging, I want to quickly cover level-matching scenes within the preset. I promise: this will be a much shorter post!
Series Tracker
This is the eleventh post in this series.
You can see the full list of these blog posts over on the dedicated Axe-FX 3 Pedal Platform Preset page.
Table of Contents
- Series Tracker
- What Is Level-Matching?
- Why Do I Need To Level-Match Scenes In My Preset?
- How To Do The Level-Matching
- Final Thoughts
What Is Level-Matching?
Level-matching is simply making sure that two different signal chains have the same overall volume.
In my setup, those different signal chains are digital: they are scenes within my pedal platform preset. And they need level-matching.
Why Do I Need To Level-Match Scenes In My Preset?
What Are Scenes In An Axe-FX 3 Preset?
If you’ve used other digital modellers or multi-fx units (like Boss’s old ME range), you’re probably familiar with the idea of having banks of presets. On those devices, you can switch between all the presets in the current bank just by stomping on a footswitch, and then you use Bank Up and Bank Down to move to a different bank of presets.
The Axe-FX 3 doesn’t work like that.
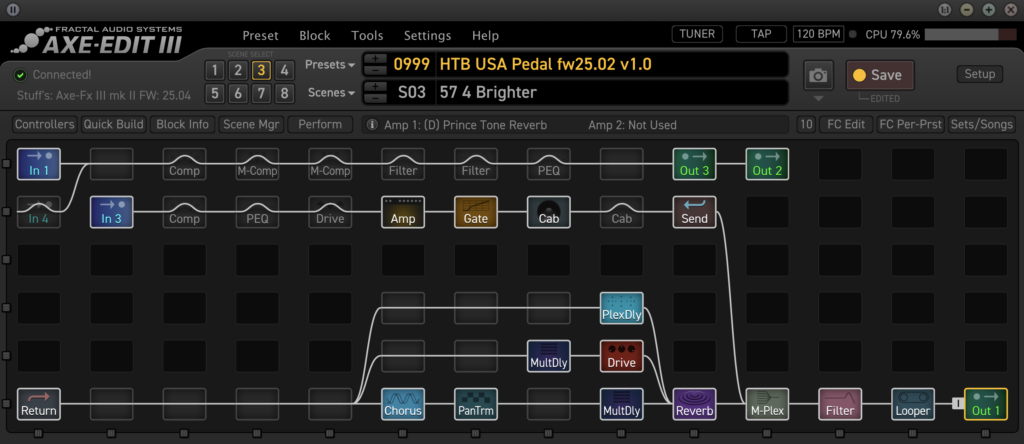
A preset is a set of effects blocks on the processing grid, and the routing between blocks. Here’s an example of what that looks like:

A preset contains 8 scenes. (We don’t have to use all of them, but they exist regardless).
A scene cannot change what blocks are on the grid. It can’t move blocks around. And it can’t change the routing at all.
“All” it can do is switch blocks on and off, and change the parameters that each block is configured to use. While that doesn’t sound like much, in practice it is incredibly powerful.
What Do All My Scenes Do?
I have 6 scenes in my pedal platform preset:
- 2 scenes that should work with most guitars,
- 2 scenes for guitars that produce a lot of low-end (i.e. my PRS Paul’s Guitar),
- and 2 scenes for the bridge pickup on my Strat.
The reason that there’s two of each is because I’ve put my 57 Vintage and 65 Clean pedal platforms into a single Axe-FX 3 preset. It’s just more convenient for me to have them both there at once.
Each of these scenes has different settings:
- some of the scenes use different amps;
- all of the scenes use different virtual microphone placements;
- most of the scenes have different EQ tools switched on too.
I use these scenes to audition (and enjoy!) the guitar pedals that I write about on this blog.
Why Do We Need To Level-Match Scenes?
There’s a basic rule of thumb with audio: louder sounds better to the human ear.
If the different scenes have different volumes, then my brain is normally going to prefer whichever scene sounds loudest. And I don’t want that.
I want the scenes to be level-matched so that it’s easier for me to decide whether a pedal sounds best through my 57 Vintage preset or my 65 Clean preset.
How To Do The Level-Matching
I’ve Already Done It!
Completely by accident too!
In the last post, I went through and did the gain-staging for my signal chain. As part of that, I used pink noise to set the audio level of the amp & cab section of each scene. I also adjusted the output level from the Axe-FX 3 into my audio interface.
Turns out, that’s the bulk of the effort to level-match scenes within a single preset 🎉
Section 7 of the Axe-FX 3 manual covers level-matching. It recommends doing this by adjusting the Level of the amp block … which is exactly what I’ve just done as part of the gain-staging work.
How I Could Do It Even Better
The one problem with my approach so far is that I don’t have precise measurements of the levels that I’ve set.
Everything inside the Axe-FX 3 is set precisely (one of the benefits of digital), but I can’t precisely measure the signal coming from my pedal board, and I can’t precisely measure the signal going into my audio interface.
I believe that professional recording studios use dedicated hardware units to get these measurements?
Places like Thomann sells monitoring units. I don’t know anything about them, though. I don’t know what features I’d need, what to avoid, how to use them, or whether they’d prove all that useful in a home hobbyist setup at all.
Advice most welcome!
Final Thoughts
I promised that this one would be short 😁
No doubt there’s something extra I should have done here; some step or two that I’ve completely missed. If you know what they are, please let me know in the comments.
