
‘Studio Diary’ is an occasional series where I talk about building a home recording setup for hobbyists and enthusiasts like us. I share my personal experiences, and the thinking behind some of the decisions that I’ve made along the way.
Fractal Audio have recently overhauled their amp modelling in the Axe-FX 3 / FM-9 / FM-3. And my recent dive into the Orange Getaway Driver has shown me that I need to revoice my signal chain. I’m taking this as an opportunity to re-evaluate everything about the pedal preset I’ve built for the Axe-FX 3.
Now that I’ve covered all the blocks that help me explore what a pedal can do, I want to focus on a few extra things that I’ve added just for me, starting with compressors.
Series Tracker
This is the 18th post in this series.
You can see the full list of these blog posts over on the dedicated Axe-FX 3 Pedal Platform Preset page.
Table of Contents
- Series Tracker
- Why Do I Want Compressors In My Pedal Platform Presets?
- Why Do I Want To Use Compressors At All?
- Placing The Compressor(s)
- The Two Compressor Blocks In My Presets
- The Challenges Of Dialling In Compressors
- Final Thoughts
Why Do I Want Compressors In My Pedal Platform Presets?
I own several real compressor pedals. Why not just use those? Here are a few reasons why I (sometimes) prefer to use the Axe-FX 3 for compression.
It’s Convenient And Consistent
My number one reason for adding compressor blocks to my presets is that it’s just easier.
- The digital blocks are always there. I don’t have to dig out a physical compressor to add to my pedalboard to try out.
- Whenever I load up a preset, my compressor settings are already there. No need to take notes and try and recreate a setting by twiddling (often unforgiving) knobs on a real pedal.
None Of My Compressor Pedals Support Sidechaining
Sidechaining is where the compressor listens to a different signal source to trigger the compression. The sidechain source can also be the normal input signal with an EQ applied first.
Alas, none of my real compressor pedals support this.
I really wish that the PRS Mary Cries did. I prefer to run it between my dirt pedals and my amp. Unfortunately, to my ears the Mary Cries seems to trigger on the low-end coming from my pedals too easily.
With the digital emulations in the Axe-FX 3, I just don’t have this problem. I can use the sidechaining support to ignore the low-end, giving me a result that works better for me.
The Compressors In The Axe-FX 3 Are Kinda Boring … And That’s A Good Thing
As far as I can tell, the Compressor block does a great job of emulating the compression effect from a whole bunch of real-world compressors, while not emulating much (if any) of the tone colouring that all of these real-world compressors also add.
For lack of a better description, they just do compression and nothing else.
That’s a good thing for me. I have compression plugins for my DAW that do all the character emulation. I’d rather leave that to them.
Noise Is Less Of An Issue With The Axe-FX 3 Compressors
In head-to-head testing, I get less noise out of the Axe-FX 3 compressors than I do from my physical compressor pedals.
Compression, by its nature, increases the amount of audible noise in the signal chain. My noise floor is already uncomfortably high, which is one reason why I don’t use physical compressor pedals early in my signal chain.
As far as I know, there’s no built-in noise reduction algorithms in the Axe-FX 3’s Compressor block, so I don’t understand why I’m getting this result. But I’ll take it!
Why Do I Want To Use Compressors At All?
Even Out My Playing Technique
Regular readers may well have heard how uneven my guitar playing can be. I’d say the vast majority of audios that I’ve posted on here contain at least one section where I dug in just a little bit too hard.
It needs to be quite subtle compression. I prefer guitar pickups and guitar pedals that support a decent range of playing dynamics, and I don’t want to lose that.
Add A Little Bit Of Extra Sustain
I’m largely playing with low-gain overdrives and amps set for plenty of clean headroom. As I understand it, this isn’t a signal chain that provides any real help for sustaining notes. (If I’m wrong, let me know in the comments below!)
I’d like to dial in a little bit of compression to help notes ring out for longer.
Smooth Out Overdrive Tones
One big difference between pedal overdrive and amp overdrive is the resulting compression. It’s one of the things that makes a dirty amp so nice to play through.
Personally, I’m actually not that fussed about the feel factor. Not for playing at home volumes.
I’m far more interested in using compression to take the top off of harsh transistor drive pedals, to give them a smoother amp-like sound. That’s the main way that I use my PRS Mary Cries pedal, and something I want on-tap in my pedal platform presets.
Placing The Compressor(s)
Where Do Compressors Traditionally Go In The Signal Chain?
There’s a lot of established practice around where to put a compressor (such as this excellent advice from Origin Effects):
- put the compressor towards the front of the signal chain as a deliberate, audible guitar effect; or
- put the compressor after the amp & cab (ie, in post-processing) to “glue” all the tracks together and produce a polished recorded guitar tone.
I’m going to leave post-processing compression to plugins in my DAW, partly because that allows me to choose a particular compressor plugin for its character (ie its tone-colouring), and partly because I think handling it in the Axe-FX 3 is too early in the signal chain for me.
What About Between Pedals And Amp?
From a bit of reading around, it looks like folks are mostly putting compressors at the end of their pedalboard to act as a boost?
If I was playing live, I think that’d be an interesting idea to explore.
The Two Compressor Blocks In My Presets
After a lot of trial and error, I’ve settled on running two compressor blocks in my pedal platform presets.

A Very Light Touch At The Front Of My Signal Chain
I’ve put a compressor block shortly after Input 1 on the Axe-FX 3. (There’s an empty slot before it, if anyone ever wants to add a virtual fuzz pedal or wah pedal there.)
This compressor is setup to mimic the famous Keeley Compressor pedal (using a tip from the Fractal Audio Wiki):
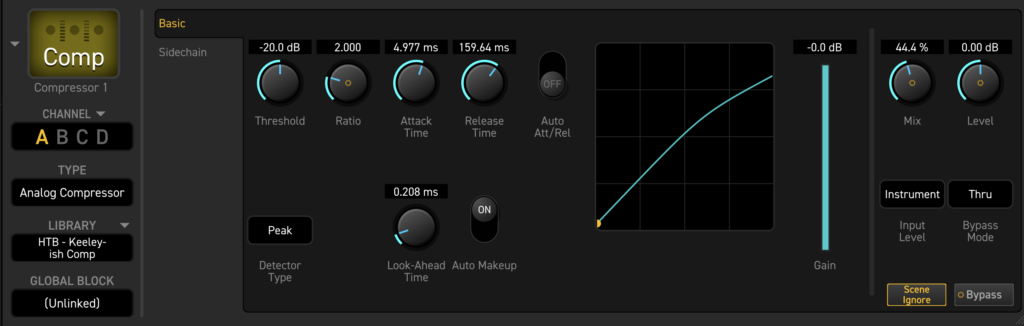
I’m trying to use this compressor to catch the worst of my sloppy playing, and sneak in a little bit of sustain too. It’s meant to be a barely-there effect, so that I can still pick lightly to clean up the amount of drive I’m getting from my pedalboard.
With the sidechain, I’ve got several things going on:
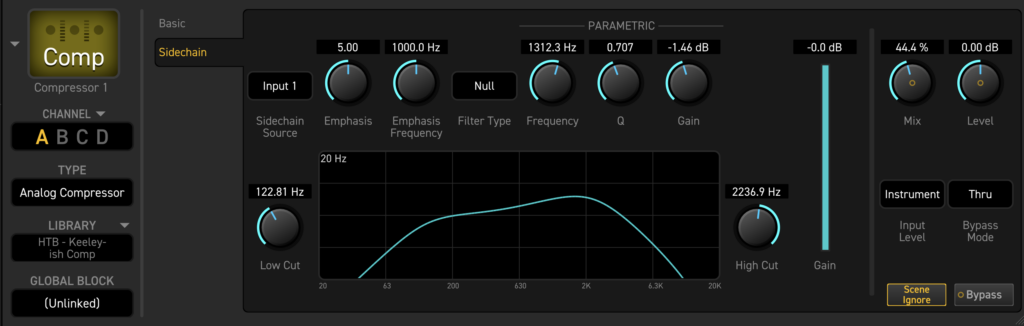
(A quick explainer: these settings are applying an EQ to the signal that gets fed into the compressor block’s detector circuit. The detector decides when to apply compression to the entire signal; it doesn’t compress different parts of the signal by different amounts. That would be an amazing creative tool to have!)
Firstly, I don’t want low-end to trigger the compressor all that much. I’m working on the assumption that anything below 120 Hz could well get filtered out later on in the signal chain (by a pedal, or my virtual Tilt EQ, or in the Cab block, or as a low-cut in the preamp in post-processing).
I also don’t want the high-end to trigger the compressor all that much. There’s a lot of noise up there, and if the high-cut I’m applying to the detector stops the noise from getting any worse, then I’ll take it.
Finally, I want the compressor to be a little more aggressive around the 1.7 kHz range. This seems to be where pick attack noise is often found (based on lots of YouTube videos I’ve watched). I’m hoping this helps to smooth that out a bit. (This one is definitely a bit of an experiment, and may not be doing anything useful in practice!)
A Little More Heavy-Handed After My Pedalboard
I’m running a second compressor block between my pedalboard and my virtual amp.
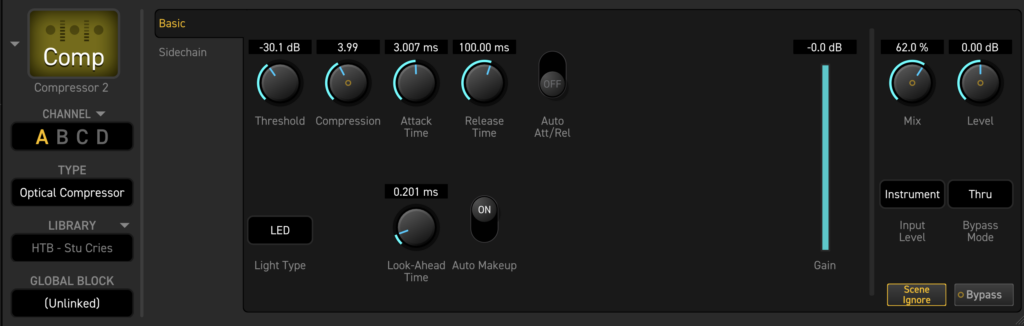
Here, I’ve gone for an optical compressor, because I’m chasing the sound of my PRS Mary Cries. I tend to run my Mary Cries quite aggressively, so I’ve gone for a similar approach.
This compressor block is doing two things:
- It’s doing most of the work to smooth out my sloppy playing levels (a bit like a compressor in post-processing would).
- It’s also compressing any harsh top-end before that hits my amp block (which is what I use my Mary Cries for).
The Challenges Of Dialling In Compressors
I Don’t Use Compressors Very Much
The first challenge I had was just how unfamiliar I am with using compression as an effect.
When I used my Mad Professor Forest Green Compressor, a) that was a long time ago now (best part of a decade?), and b) I used it mostly as a boost / tone-colouring tool.
While my PRS Mary Cries compressor has been ever-present in my signal chain over the last couple of years, it’s basically a one-knob pedal (two if you count the output volume control too). There really isn’t much to tweak. I’d turn it on, listen to the result, and if I didn’t like what it was doing, the only real option was to turn it off again.
Finding Useful Information
What exactly does a PRS Mary Cries do internally? What compression ratio does it offer? What are the attack and release speeds? Those are just some of the questions that I’ve been unable to find answers to online.
Unfortunately, Google searches rarely seem to return relevant information any more. No matter what I try, it just keeps returning listings for shops selling the pedal, plus adverts for (sometimes the same) shops also selling the pedal.
The other issue with finding useful information was just how many guitarists consider compression to be ‘cheating’ in some way. There’s plenty of forum threads out there where folks asking for help with compression get shot down instead.
Ear Fatigue
I found that my brain quickly adapted to whatever compressor settings I’d dialled in. And once it had, I really struggled to hear what the compressor was doing to my guitar tone.
The biggest problem was just how much it confused my brain. Time and time again, when I engaged the compressor, I could hear that the final recorded tone had changed; I just couldn’t tell how it had changed.
This really slowed me down.
The only answer was to work on the settings in short sessions first thing in the day, and walk away for the rest of the day as soon as I realised that I couldn’t discern the changes any more.
I Don’t Use The Compressor Blocks Very Much
I think it’s important to spend time with each aspect of these pedal platform patches. I find that really helps me get the settings all nicely settled. I feel like I need weeks – not days or hours – to grow comfortable with the decisions that I’m making.
That’s a bit tricky when I’m working on a feature that I don’t use very often … like these compressor blocks.
Originally, I was hoping to finalise these settings and publish this article before Christmas 2024. But I needed the extra time. And even now, I’m still not confident in my choices.
I Don’t Know How These Settings Will Impact Post-Processing
My biggest worry is that these settings will cause problems for applying compression in my DAW.
Again, this is down to my lack of experience of working with compression. Oh, and my lack of experience of doing post-processing. A perfect storm of the two together, if you like.
Advice welcome in the comments below.
Final Thoughts
These two compressor blocks are getting me “better” results than I got from physical compressor pedals:
- there’s a lot less noise (which I can’t explain), and
- there’s no tone-colouring going on (that I can hear), only signal compression.
I’m very happy with these benefits.
So, am I done with using physical compressor pedals? What am I going to do with those pedals now?
At the time of writing, I’m not sure, so I’m going to hang onto them for now. Maybe I’ll find a creative use for them. Maybe I’ll find that I go back to them, that (in the long run) I prefer them over the Fractal Audio compression models.