Making Music is where I share the process as I write, arrange, record and release my music. You’ll get to read it all: what went well, what really didn’t, the decisions I had to make along the way, and why I made them. I hope you find it useful!
When I’m recording music, my first step is to create a tempo / section block map. What is that, and how do I go about doing it?
Table of Contents
- Introduction
- What Is A Tempo Map?
- Do I Need A Tempo Map?
- Setting Up The Metronome In Reaper
- Setting The Tempo In Reaper
- Choosing A Tempo
- Recording The Scratch Track
- Tools Need Prepping For Next Time
- No Tempo Map Needed This Time
- Adding The Section Map
- Next Steps
- Time Tracking
- Bonus Bit
- Final Thoughts
Introduction
I’m writing this on Thursday 4th August. My first session sitting down to work on actual music 😱
My plan for tonight is to get these done in Reaper for my song Ragged Perceptions:
- tempo map
- section block / region map
To do this, I’m also going to have to record a rough scratch track. It won’t be used in the final recording, so mistakes are fine – but it does need to be somewhat in time!
What Is A Tempo Map?
Apologies if you already know some of these terms. I think it’s important that I share what I mean when I use these terms, just in case you’re new to them, or I’m using the wrong names for each of these.
Every piece of music has a tempo. It’s the speed that the piece is performed at. It’s got two components:
- the time signature (e.g. 4/4) and
- the number of beats per minute (BPM for short)
Some songs just have one tempo throughout. But they don’t have to. In the band, we do at least one cover song that switches between two tempos at various points.
A tempo map is where we create zones in our DAW project for each tempo that the song uses.
- We set the default tempo for the whole project using what are sometimes called the transport controls.
- We override the default tempo for sections of the project by adding tempo markers to the project’s timeline.
When we add tempo markers to the project, that forms the tempo map.
Do I Need A Tempo Map?
To answer this question, I need to:
- work out the default tempo that I want to perform the song at
- capture a scratch track
- see if the scratch track intentionally changes tempo at any point
My starting point? I need to get the metronome ticking inside Reaper, and then I need to play along. Things will take care of themselves from there.
Setting Up The Metronome In Reaper
If I go into Reaper’s metronome settings, I can change the Beat Pattern to suit my playing:
The pattern ‘ABBB’ means:
- loud click on the first beat of the bar
- quieter clicks on beats 2, 3 and 4 of the bar
assuming I’m in 4/4 time for this, anyways!
Depending on the song, I sometimes prefer to use the pattern ‘A.B.’, which means:
- loud click on the first beat of the bar
- quieter click on beat 3 of the bar
Choosing the metronome pattern is, for me, ultimately a feel thing. Some songs feel hurried with the ‘ABBB’ pattern. Some songs feel lost with the ‘A.B.’ pattern. I’ve no idea which pattern is going to work for any particular song until I give it a go.
Tonight, after a lot of time experimenting, I settled on the ‘A.B.’ pattern.
Setting The Tempo In Reaper
The tempo is set in this set of controls that (by default) are on the right-hand side of the screen:

On my screen, they are really tiny – 6 or 8 pt font perhaps – and really difficult to read, even with my glasses on. I’ve no idea why they are so small – there’s plenty of empty screen around them. It’s not saving any space that is being used for anything else.
This is one of the reasons why I’m unlikely to stick with Reaper long-term: the Reaper v6 UI has plenty of accessibility issues like this one. Ironically, given how Reaper has so many options and preferences, there doesn’t seem to be one to boost the size of UI components like this.
Choosing A Tempo
Here, I just experiment with different BPM settings until I chance on a speed that I’m happy to play along with:
- guess the BPM
- set it in Reaper using those tiny tiny controls
- play along to the metronome
- realise the BPM is wrong
- rinse and repeat
You can repeatedly click the BPM control to set the speed that way. This is commonly referred to as ‘tap tempo’.
I don’t use the tap tempo approach for guessing the BPM. I’m too busy performing the piece to have a spare hand to tap the tempo into Reaper. Whenever I try, I always end up with a tempo that’s quite wide of the mark!
Eventually, I settled on 136 BPM for this song. I almost picked 132 BPM instead – even took that screenshot with 132 BPM dialled in – but after repeated playthroughs, I preferred the slightly faster pace.
I’m pretty sure that this piece isn’t in 4/4. I don’t really know what I’m doing with time signatures, or how to play along to anything other than a 4/4 beat. For now, I’ve stuck with 4/4. That may prove to be a mistake down the road.
With the project’s default tempo chosen, I now need to work out if I need to build a full tempo map or not. To do that, I need to record a scratch track.
Recording The Scratch Track
A scratch track is just a rough recording for playback purposes. When I’m working on my own, I find it a lot easier to build a full song and arrangement if I’ve got a playthrough of the main rhythm track to listen to.
(When Tess and I are writing arrangements for the band, we do it very differently.)
My word, I struggled with this tonight.
The main guitar rhythm for Ragged Perceptions is right at the limit of my playing ability. I’ve been practicing this for about 18 months now, yet I’m still falling apart the moment the recording starts and that metronome starts to tick.
Guess who hasn’t practiced it to a metronome before today?
Eventually, I got something usable down. It’s shonky as anything, and full of mistakes. It also fades in and out in places, because I don’t have the noise gate on my Axe-FX 3 dialled in for finger-style playing.
Tools Need Prepping For Next Time
Speaking of which … because this is a throw-away recording, I just used whatever electric guitar and pedal was already cabled up. For tonight, I don’t care how it sounds. It just needs to be there.
I thought I was saving time by taking this approach; I think I was wrong. I think I made tonight harder for myself, by using a guitar I don’t play finger-style on, using a guitar tone that’s designed for playing riffs with a pick.
For next time, I need to:
- work out which guitar is easiest to play finger-style on (perhaps I should be using my acoustic plugged in?)
- build an Axe-FX preset that suits that guitar and suits finger-style playing
Maybe that could be the starting point of my live patch? That’s something else I haven’t built yet, partly because we can’t see ourselves doing that level of gigging this calendar year.
Anyways, with the scratch track recorded (no, you can’t hear it – it is genuinely embarrassingly bad!), let’s move on.
No Tempo Map Needed This Time
Listening back to the scratch rhythm track, I don’t hear any deliberate tempo changes in this particular song.
I can move on and block out the different sections of the song.
Adding The Section Map
What Is A Section Map?
A section map is a visual guide to the different parts of the song. You label sections of the song as ‘verse’, ‘chorus’, ‘bridge’, and / or any other terms that mean something to you.
I’ll show you a screenshot of the section map further down.
Why Add A Section Map?
This particular song is about 3 mins 40 seconds long. I’m going to be recording different parts at different places in the song. For example, the first lead melody is played over the second verse; the second lead melody is played over the third verse.
I don’t want to have to remember where the second verse starts, and I don’t want to have to guess either.
When I’m working with Tess, the section map helps her instantly understand where we are in a recording. She can just look at the screen and see where in the song we’re currently working.
I believe (I’ve never done this myself) that section maps are also very helpful if you send your music off to be mixed and/or mastered by someone else. It helps the mixing or mastering engineer understand your intention for any given part of the piece of music. In turn, that helps them make decisions, for example when to inject energy into a section.
Section maps are a great collaboration tool. They don’t take long to create, and they save everyone time and effort.
Step One: Adding Markers
You can just go straight to adding Regions in Reaper. I find it quicker to add markers first, and then to come back in a second pass to create Regions between the markers.
You’ll find the Marker on the Insert menu:
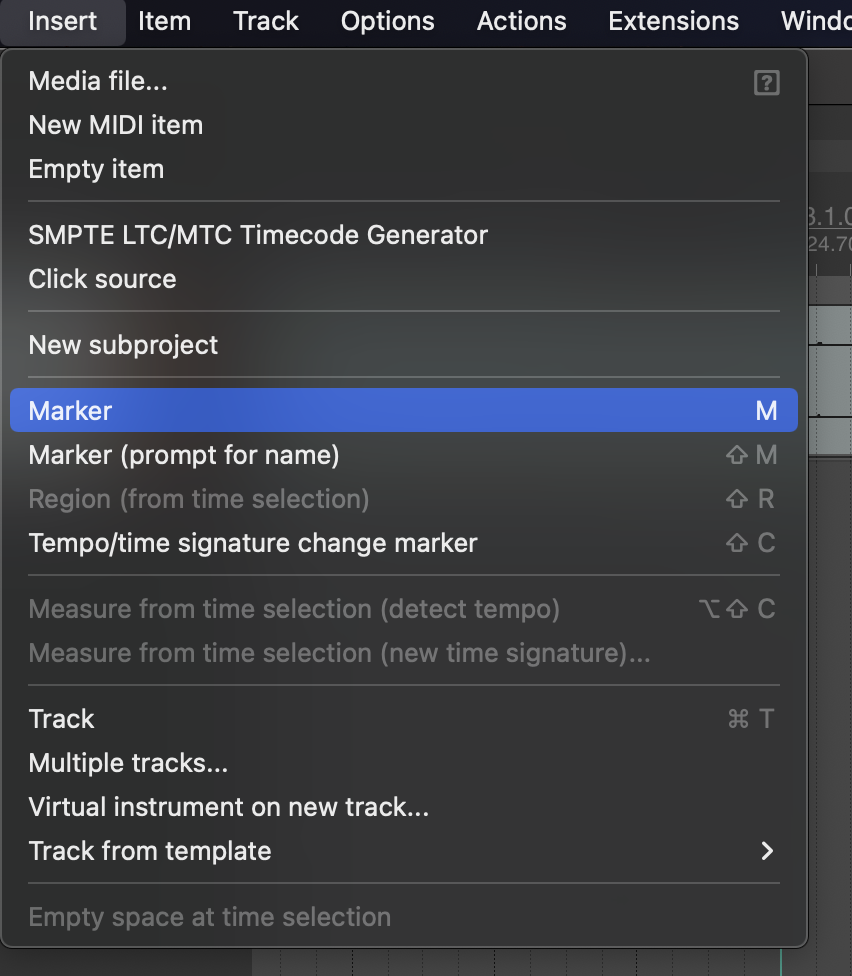
This adds a rather nondescript marker to the timeline. It’s the somewhat tiny red line shown in this screenshot:
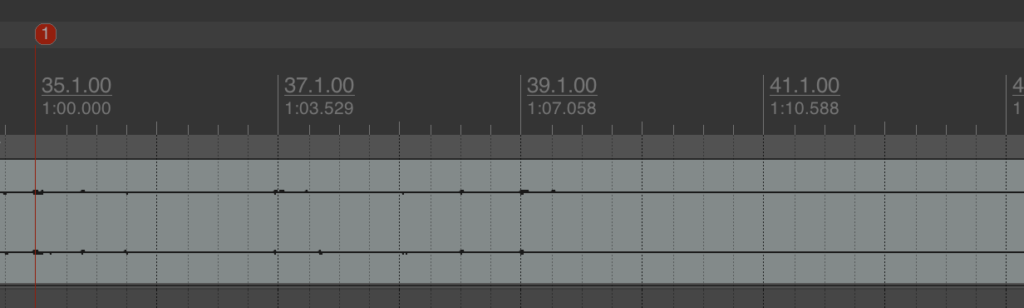
I go through the entire song, and pause it whenever I want to add a marker. I make sure the play head is at the place where I want the next marker, and then I just insert another Marker.
In Reaper, you can edit Markers: give them names, change their colours. I don’t tend to do that at this point, because I’m going to do that to Regions instead.
Step 2: Create Regions
Once I’ve placed all my Markers, I go and select the timeline between each pair of Markers. Then, I go back into the Insert menu, and choose the ‘Region’ menu option:
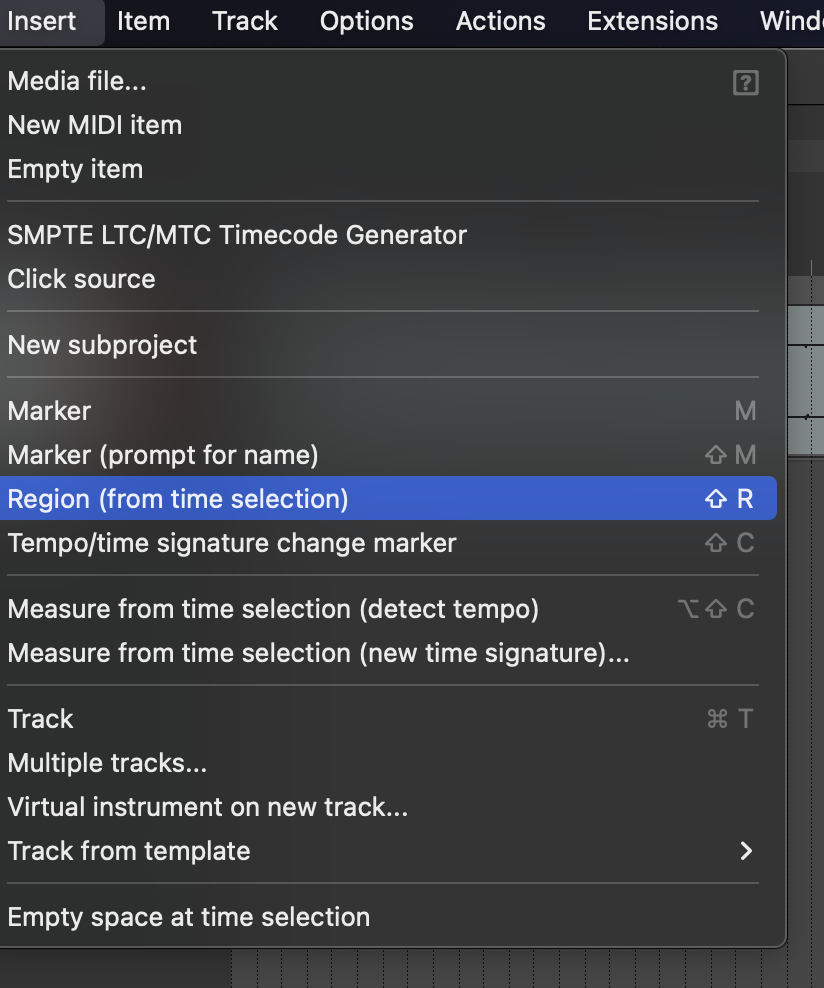
In Reaper, this adds a visual indicator above the timeline, shown here in this awful off-teal / grey colour:

I don’t assign names to Regions as I go, and I don’t colour-code them yet either.
Step 3: Bulk-Editing Regions
I find it’s faster to create the Regions first, and then sort all of that out using the Region Manager tool afterwards:
Don’t ask me where it is, I can never remember. I find it by going to the Help menu, and typing in ‘Region Manager’. That shows me which menu it is buried in.
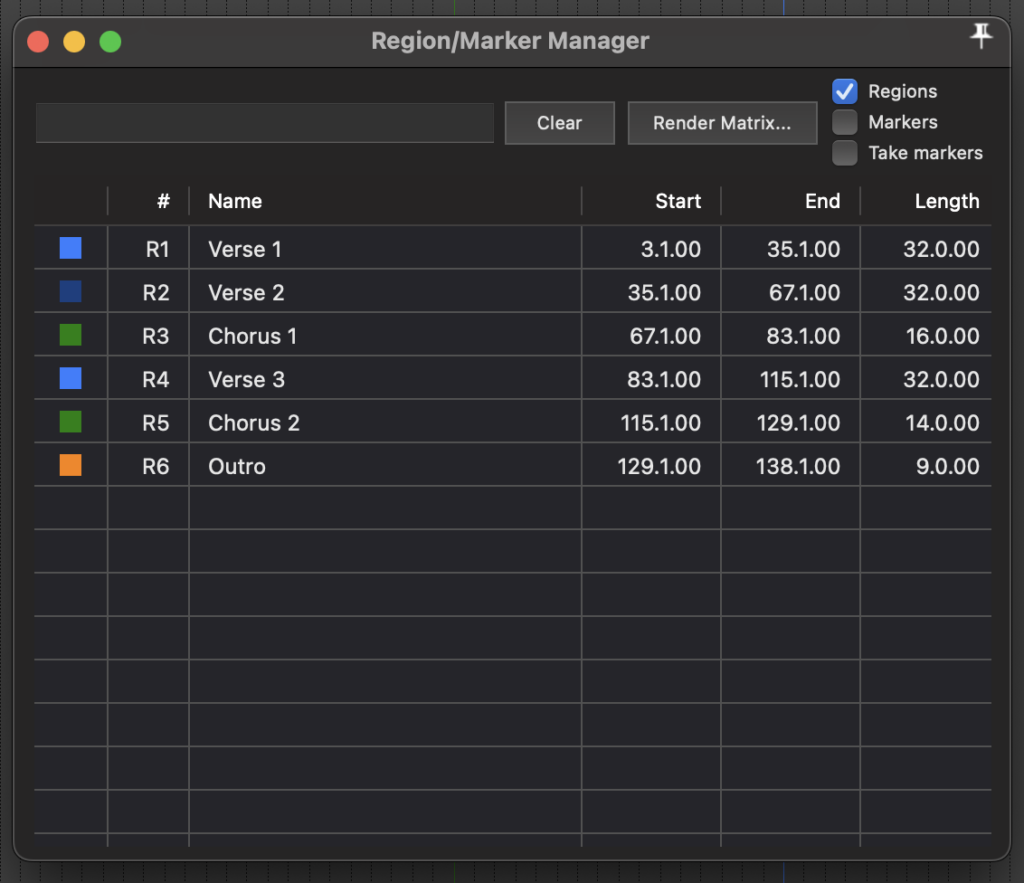
The Region Manager is a great tool. I can assign names to each Region, and colour-code them too. The end result looks like this:

Next Steps
Despite my struggles tonight, in many ways this was the easy bit!
I’ve been playing this song since 1991, and until now, it has never had any percussion of any kind. Is that about to change? I’m going to give that a lot of thought before my next recording session.
That’s not the only arrangement decision to think about. This piece has always been a solo acoustic guitar. Would additional guitars be interesting, perhaps as accent pieces? What about bass guitar or a keyboard track? Or would this track lose its impact if I add these in?
It’s always had two melody / lead sections – but I haven’t played those since the mid-90s. I need to learn both of those parts. That’ll be fun, because I’m pretty sure my old recording was made in D standard, not E standard. Not only do I have to transcribe both parts, but I’ve also got to transpose them at the same time.
Both of those lead parts were played using a Roland guitar synth, which I no longer have. Do I still want them to be virtual instruments (a clarinet and a flute if I recall correctly), or do I want them to be electric guitar instead? I don’t have to commit yet, but I will need to buy some more gear if I want to stick with the virtual instruments.
I want all of the Phase 1 material to have a common sound and feel, as-if it was recorded as a collective piece of work. Part of that is going to be using similar instrument tones for all of the songs. To pull that off, I think that I want to block out all of the songs before I record any final performances. That way, I can jump backwards and forwards between them all as I choose guitar tones.
Time Tracking
I think it’ll be useful to keep track of how long each of these recording sessions are.
This music session took about three hours on a Thursday evening. Some of that time was spent capturing rough notes and screenshots along the way for this blog post.
Bonus Bit
If you’ve read this far, I’ve got a bonus for you. Click this link to hear my original recording of this song from 1998. That’s what I’m looking to record using the tools and the skills I’ve acquired since.
For reference, that was all recorded using an old Roland guitar synth, onto an equally old 4-track tape machine. Amusingly (well, I find it amusing, anyways), that’s literally the one and only time I’ve been able to play the entire rhythm track through in a single take. I actually played that with pick, too. It’s a lot easier to play finger-style!
And – shock! horror! – no tweed-tone to be found anywhere on it 😂
Final Thoughts
I’ve got mixed feelings about tonight.
On the one hand, everything got done. I have started the project; I have a scratch recording to build around; and I have mapped out the different sections that the song will have. In that respect, the session was a complete success.
It was a lot harder than I was expecting, though. I found it very challenging to work out the tempo and get a usable scratch track down. It’s my first time doing this for this project, and I’m not yet practiced at it.
Speaking of practice: I really do need to work on playing ‘on the grid’, or to a metronome. That used to be one of my core performance skills, but somewhere over the years I’ve lost it, and lost it badly.
I am a little frustrated by Reaper v6’s UI, and I’m sure that comes through in what I’ve written about tonight’s session. Thankfully, I know how to do what I want in Reaper, at least on the audio side. I just wish the UI was as configurable. If I stick with Reaper long-term (and there are good reasons to do so), I’m going to have to disappear down the rabbit hole of re-theming the damn thing. What an avoidable waste of creative time.
I don’t know what I’m going to do in next week’s session. I’ll figure that out nearer the time.
One Reply to “Making Music #2: Blocking Out “Ragged Perceptions””